

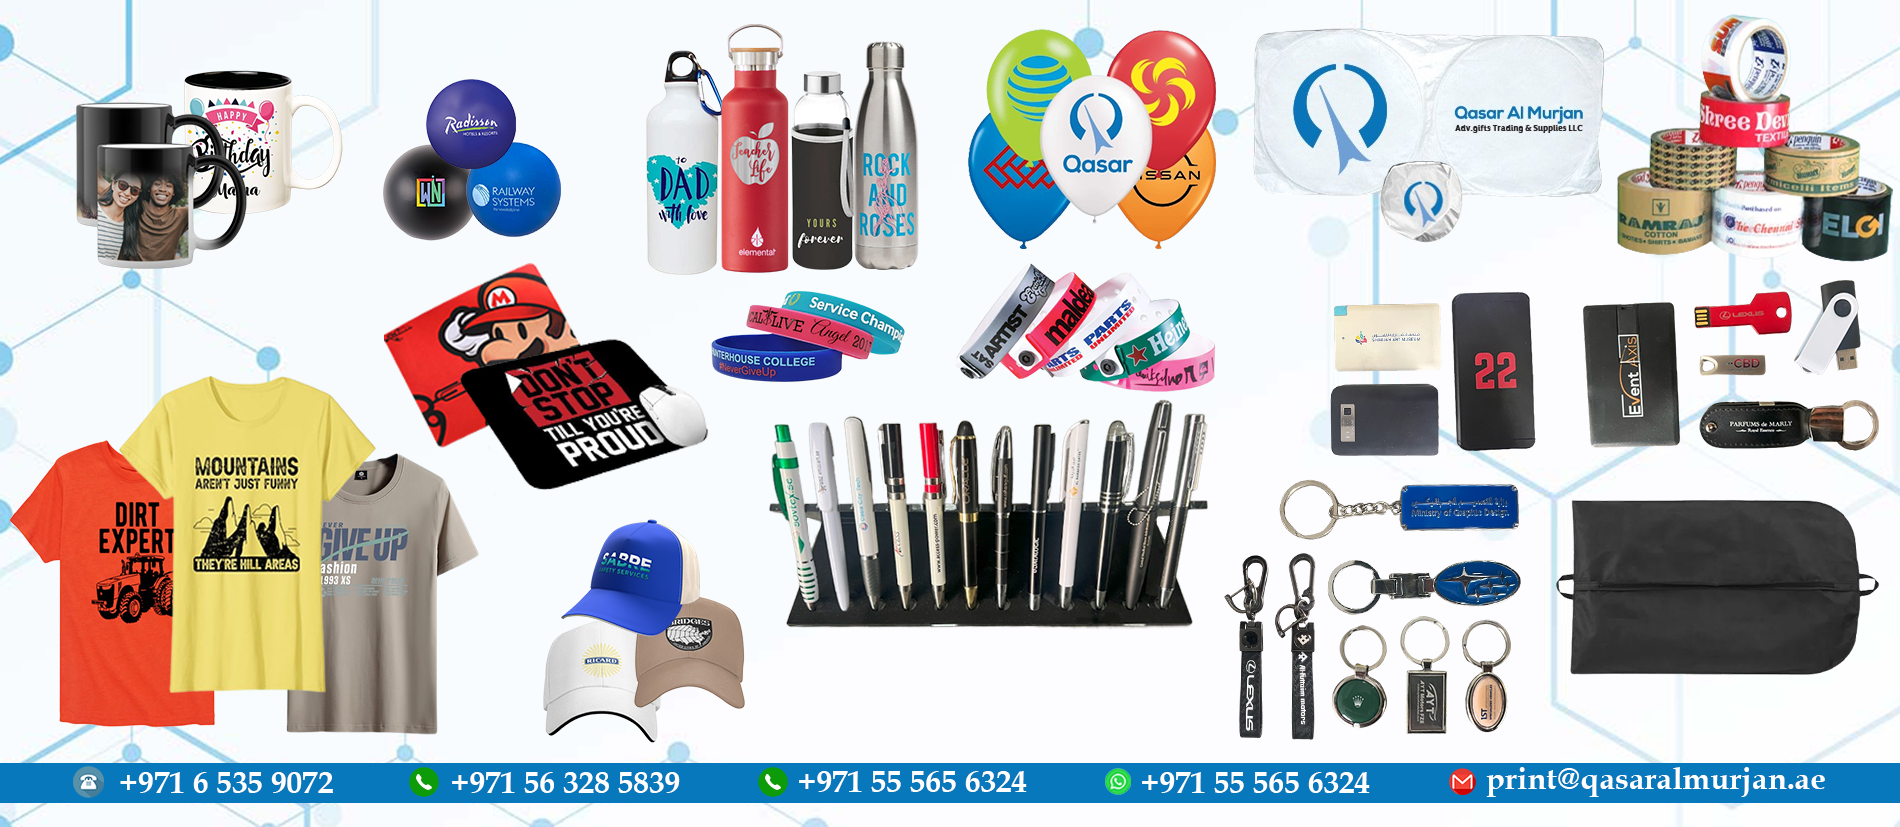
Reel badge printing involves creating identification badges or cards using a reel printer. These printers are often used for making employee ID badges, membership cards, event passes, and other types of identification cards that require a durable and professional appearance.

Design: Create the badge design using specialized software or our designer make it for you. This can include the layout, text, images (like a photo of the person), logos, and any other elements you want on the badge.
Card Stock: Select the type of card stock you will use. Most ID badges are printed on PVC cards, which are durable and long-lasting.
Printer Setup: Set up the reel printer. This involves loading the card stock, ensuring the printer has ink or ribbon, and configuring the printer settings according to the badge specifications.
Printing: Print the badges using the reel printer. These printers often use dye-sublimation or direct-to-card printing methods to ensure high-quality and full-color output.
Lamination (Optional): Some badges are laminated for extra protection. This step can be done using a laminating module attached to the reel printer or a separate laminating machine.
Attachment: Attach a reel clip or badge holder. This is often a retractable reel that allows the badge to be pulled out and scanned while remaining attached to the person.

Creating reel badges with epoxy involves a few additional steps compared to standard badge printing. Epoxy can be used to create a durable, glossy finish on the badge, adding an extra layer of protection and a professional look.
Design the Badge: Use your chosen software to design the badge. Include all necessary information: name, photo, employee number, logo, and any additional graphics or text. Save the design in a high-resolution format.
Print the Badge: Set up the reel printer with the appropriate ribbon and card stock. Load the design into the printer software. Print a test badge to ensure the design and colors are correct. Print the required number of badges.
Apply the Epoxy Resin:
Mix the Epoxy: Follow the manufacturer’s instructions to mix the epoxy resin and hardener. Ensure the mixture is free of bubbles.
Prepare the Work Area: Cover your work surface and wear protective gloves and eyewear.
Apply the Epoxy: Place the printed badges on a flat surface. Use a small dropper or a stick to apply the epoxy resin to the surface of each badge. Spread the epoxy evenly, allowing it to dome slightly without overflowing the edges.
Cure the Epoxy: Allow the badges to sit undisturbed while the epoxy cures. This may take several hours to a full day, depending on the epoxy product used. Ensure the area is dust-free to avoid particles settling on the epoxy.
Attach the Reel Clips: Punch a hole at the top of each badge if one isn’t already present. Attach the retractable reel clip to the badge.
Quality Check: Inspect each badge for quality, ensuring the epoxy is fully cured and the finish is smooth and glossy Check the attachment of the reel clips for security.

Button badge printing is a popular method for creating custom badges for various purposes, such as promotional items, event giveaways, or personal accessories. Creating button badges with UV printing involves using a UV printer to directly print high-quality, durable images onto the surface of the badge components. UV printing provides excellent color vibrancy and durability, making it a great choice for producing professional and long-lasting button badges.
Design the Badge: Use your chosen software to create the badge design. Ensure the design fits within the dimensions of your button size (e.g., 1-inch, 2.25-inch, etc.). Include any text, images, and graphics you want on the button. Save the design at a high resolution for clear printing.
Prepare the UV Printer: Set up your UV printer according to the manufacturer’s instructions. Ensure the printer is configured to handle the button parts you are using.
Print the Design: Load the button parts (specifically the metal shells) into the UV printer. Print the designs directly onto the metal shells. UV printing will cure the ink immediately, creating a durable and vibrant image.
Cut Out the Designs (if needed): If your UV printer prints on a sheet of button parts, use a circle cutter to cut out each design precisely. Ensure the cut designs match the size of the button parts.
Assemble the Button Badges: Set up your button maker machine according to the manufacturer’s instructions.
- Step-by-Step Assembly:
- Place the printed metal shell (front part) into the machine.
- If using, place the mylar or plastic cover over the design for extra protection (though often unnecessary with UV printing).
- Press the machine handle to crimp these pieces together.
- Place the pin back (back part with the pin) into the machine.
- Press the machine handle again to secure the back to the front part.
- Step-by-Step Assembly:
Quality Check: Inspect each button badge to ensure the design is centered, and all parts are securely attached. Check the pin mechanism to ensure it works properly.

Creating an aluminum plate with an epoxy finish involves combining the durability of aluminum with the glossy, protective layer of epoxy. This process is commonly used for making high-quality signs, nameplates, or decorative items.
Prepare the Aluminum Plate:
- Clean the Plate: Thoroughly clean the aluminum plate to remove any dirt, oil, or oxidation. Use a degreaser and a fine abrasive pad if necessary.
- Sand the Surface: Lightly sand the surface of the aluminum to create a rough texture for better adhesion of the epoxy.
Apply the Design:
- Vinyl Decal: Cut your design from adhesive vinyl using a vinyl cutter. Apply the vinyl decal to the aluminum plate.
- Sublimation Printing: If using sublimation, print your design on sublimation paper and use a heat press to transfer the design onto the aluminum plate.
- Direct Printing: If you have a UV printer or another suitable printer, print directly onto the aluminum plate.
Prepare the Epoxy:
- Mix the Epoxy: Follow the manufacturer’s instructions to mix the epoxy resin and hardener. Mix thoroughly to avoid bubbles and ensure a uniform consistency.
Apply the Epoxy:
- Spread the Epoxy: Pour the mixed epoxy onto the center of the aluminum plate. Use a spreader or brush to evenly distribute the epoxy across the surface.
- Remove Bubbles: Use a heat gun or torch to remove any air bubbles from the epoxy surface. Hold the heat source a few inches above the epoxy and move it in a sweeping motion.
Cure the Epoxy:
- Allow to Cure: Place the aluminum plate on a flat, dust-free surface. Allow the epoxy to cure according to the manufacturer’s instructions, usually 24-72 hours.
- Cover the Plate: To prevent dust and debris from settling on the epoxy, cover the plate with a clean plastic container or a similar protective cover.
Finishing Touches:
- Inspect the Plate: Once the epoxy is fully cured, inspect the plate for any imperfections or missed spots. If necessary, apply a second layer of epoxy.
- Polish the Edges: If there are any sharp edges or drips, carefully sand and polish the edges for a smooth finish.
Creating an aluminum plate with sublimation printing involves transferring a design from a specially printed sheet onto the aluminum surface using heat and pressure. Sublimation printing on aluminum produces vibrant, durable, and high-resolution images, making it an excellent method for creating signs, awards, and decorative items.
Print the Design: Print the design onto sublimation paper using your sublimation printer. Make sure the print settings are configured correctly for sublimation printing (correct paper type, print quality, etc.).
Prepare the Aluminum Plate:
- Clean the Plate: Ensure the aluminum plate is clean and free of dust, fingerprints, and oils. Use a lint-free cloth or a microfiber cloth for cleaning.
- Preheat the Plate (if necessary): Some aluminum plates may require preheating. Check the manufacturer’s instructions.
Align the Design: Place the printed sublimation paper face down onto the aluminum plate. Use heat-resistant tape to secure the paper in place to prevent shifting during the transfer process.
Heat Press Setup:
- Temperature and Time: Set your heat press to the recommended temperature and time for aluminum sublimation (usually around 375-400°F for 60-90 seconds, but check the manufacturer’s guidelines).
- Pressure: Adjust the pressure of the heat press to medium-firm. Too much pressure can damage the plate, while too little pressure can result in an incomplete transfer.
Transfer the Design: Place the aluminum plate with the attached sublimation paper in the heat press. Close the heat press and start the timer. Once the time is up, carefully open the heat press and remove the aluminum plate using heat-resistant gloves.
Cool and Finish: Carefully peel off the sublimation paper while the plate is still warm. Allow the aluminum plate to cool down completely on a flat surface to avoid warping.
Inspect and Clean: Inspect the finished plate for any imperfections or incomplete transfers. If necessary, clean the plate with a soft cloth to remove any residue.